Prerequisites
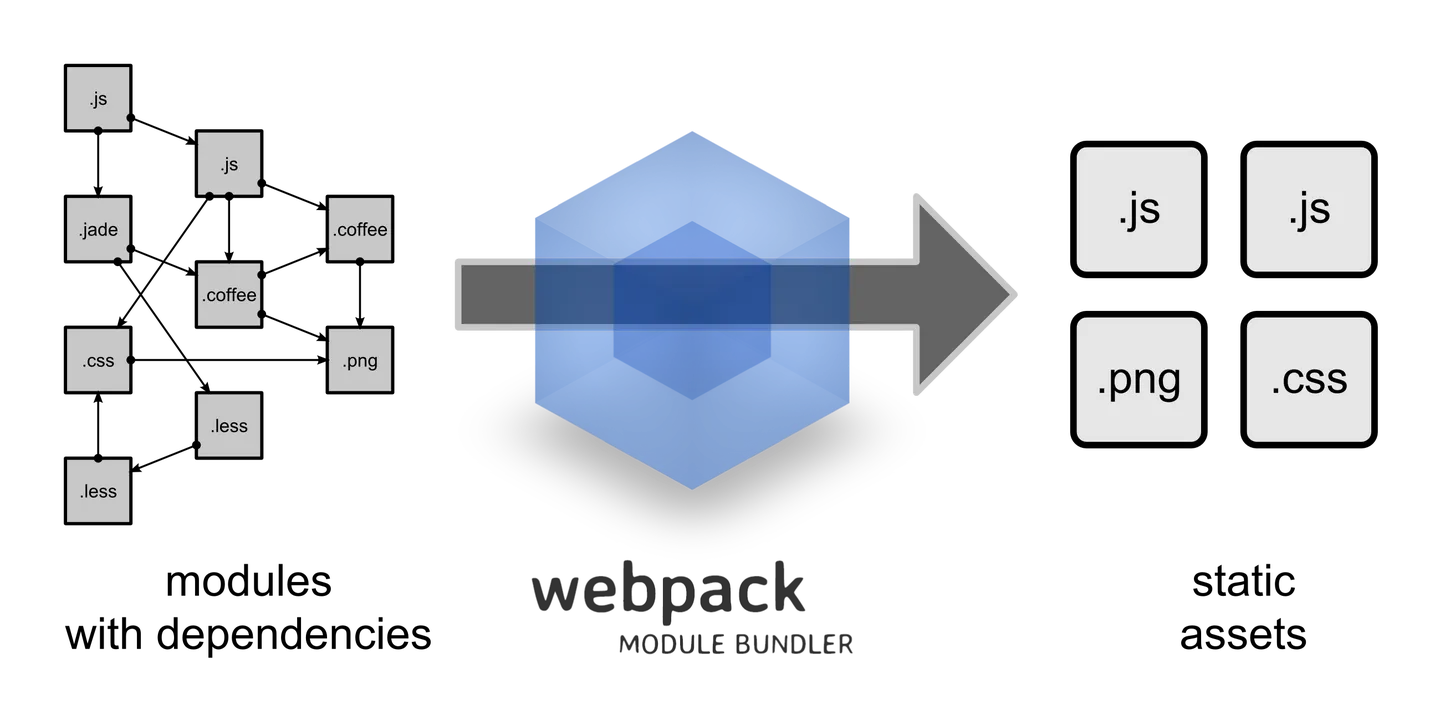
Webpack
将 js 代码打包到一个文件中

安装:npm install webpack -g
使用:webpack <input> <output>
vue cli(deprecated)
Vue CLI the official webpack-based toolchain for Vue. It is now in maintenance mode and we recommend starting new projects with Vite unless you rely on specific webpack-only features.
安装:npm install -g @vue/cli
创建项目:vue create my-project
# serve
vue-cli-service serve --host 0.0.0.0 --port 8080

# build
vue-cli-service build

# lint
vue-cli-service lint
vite
创建项目:npm create vite@latest
# serve at localhost
vite

# serve at 0.0.0.0
vite --host

# build only
vite build

# preview
vite preview
配置文件 vite.config.mjs
import {defineConfig} from "vite";
import vue from "@vitejs/plugin-vue";

// https://vitejs.dev/config/
export default defineConfig({
  plugins: [vue()],
  server: {
    watch: {
      usePolling: true, // hot reload
    }
  },
});
初始化
npm create vue@latest # 实际也是使用的 vite 构建
# or
npm create vite@latest
可以看到创建了以下文件
public/
src/
|- App.vue
|- main.js
index.html
package.json
vite.config.js
其中,package.json 内容如下,可以看出其实是使用 vite 来构建的项目,与 npm create vite@latest 命令类似。不过用 vite 初始化支持更多的 web 框架,例如 react、nuxt 等
{
  "name": "demo",
  "version": "0.0.0",
  "private": true,
  "type": "module",
  "scripts": {
    "dev": "vite",
    "build": "vite build",
    "preview": "vite preview"
  },
  "dependencies": {
    "vue": "^3.4.21"
  },
  "devDependencies": {
    "@vitejs/plugin-vue": "^5.0.4",
    "vite": "^5.1.6"
  }
}
src/main.js 是入口文件,这里引入根组件 App.vue
import { createApp } from 'vue'
import App from './App.vue'

createApp(App).mount('#app')
修改 App.vue 即可进行 vue 应用的开发
安装依赖包
npm install
运行
npm run dev
环境配置
# install nvm
curl -o- https://raw.githubusercontent.com/nvm-sh/nvm/v0.36.0/install.sh | zsh
export NVM_NODEJS_ORG_MIRROR=https://npm.taobao.org/mirrors/node/

# install node
nvm install node
nvm install 12.19.0 # 指定版本
nvm use 12.19.0 # 使用版本
nvm alias default 12.19.0 # 设置为 default 版本

# npm registry
npm config set registry https://registry.npm.taobao.org

# 安装 module
npm install <module> # 为当前目录安装 module,只会安装到当前目录的 node_modules 目录下
npm install <module> -g # 全局安装 module
npm install --save <module> # -S: 安装 moduel 的同时将其添加到 package.json 的 dependencies 中
npm install --save-dev <module> # -D: 只在开发过程中用到的模块,添加到 package.json 的 devDependencies 中

# update npm
npm update -g

# install cnpm
npm install -g cnpm --registry=https://registry.npm.taobao.org

# intall webpack
# i 表示 install, -D 表示 --save-dev, -S 表示 --save
npm i -D webpack
npm i -D webpack-cli

# intall vue-cli
npm install vue-cli -g

# 运行Web服务
npm run dev
webpack 配置文件
module.exports = {
    entry: './src/scripts/index.js',    // 需要被打包的js文件路径及文件名
    output: {
        path: __dirname + '/dist',    // 打包输出的目标文件的绝对路径(其中__dirname为当前目录的绝对路径)
        filename: 'scripts/index.js'   // 打包输出的js文件名及相对于dist目录所在路径
    }
};
Syntax
Template Syntax
text
<span>Message: {{ msg }}</span>
v-html
<p>Using v-html directive: <span v-html="rawHtml"></span></p>
v-bind:Attribute 绑定
<div v-bind:id="dynamicId"></div>
or using shorthand
<div :id="dynamicId"></div>
boolean variable
<button :disabled="isButtonDisabled">Button</button>
bind multiple attributes
const objectOfAttrs = {
  id: 'container',
  class: 'wrapper'
}
<div v-bind="objectOfAttrs"></div>
valid expression
{{ number + 1 }}

{{ ok ? 'YES' : 'NO' }}

{{ message.split('').reverse().join('') }}

<div :id="`list-${id}`"></div>
call function
<time :title="toTitleDate(date)" :datetime="date">
  {{ formatDate(date) }}
</time>
dynamic arguments
<a v-bind:[attributeName]="url"> ... </a>
<!-- shorthand -->
<a :[attributeName]="url"> ... </a>
v-on:事件处理
<a v-on:click="doSomething"> ... </a>
shorthand
<a @click="doSomething"> ... </a>
dynamic arguments
<a v-on:[eventName]="doSomething"> ... </a>
<!-- shorthand -->
<a @[eventName]="doSomething"> ... </a>
inline handlers
<script setup>
const count = ref(0)
</script>

<template>
  <button @click="count++">Add 1</button>
  <p>Count is: {{ count }}</p>
</template>
method handlers
<script setup>
const name = ref('Vue.js')

function greet(event) {
  alert(`Hello ${name.value}!`)
  // `event` is the native DOM event
  if (event) {
    alert(event.target.tagName)
  }
}
</script>

<template>
  <button @click="greet">Greet</button>
</template>
call methods in inline handlers
<script setup>
function say(message) {
  alert(message)
}
</script>

<template>
  <button @click="say('hello')">Say hello</button>
  <button @click="say('bye')">Say bye</button>
</template>
v-if:条件渲染
<h1 v-if="awesome">Vue is awesome!</h1>

<h1 v-if="awesome">Vue is awesome!</h1>
<h1 v-else>Oh no 😢</h1>


<div v-if="type === 'A'">
  A
</div>
<div v-else-if="type === 'B'">
  B
</div>
<div v-else-if="type === 'C'">
  C
</div>
<div v-else>
  Not A/B/C
</div>
v-for:列表渲染
<div v-for="item in items">
  {{ item.text }}
</div>

<div v-for="(item, index) in items"></div>
<div v-for="(value, key) in object"></div>
<div v-for="(value, name, index) in object"></div>

<div v-for="item in items" :key="item.id">
  {{ item.text }}
</div>
v-model:表单输入绑定
text:use value property and input event
<p>Message is: {{ message }}</p>
<input v-model="message" placeholder="edit me" />
multiline text:use value property and input event
<span>Multiline message is:</span>
<p style="white-space: pre-line;">{{ message }}</p>
<textarea v-model="message" placeholder="add multiple lines"></textarea>
checkbox:use checked property and change event
<input type="checkbox" id="checkbox" v-model="checked" />
<label for="checkbox">{{ checked }}</label>
multiple checkboxes
<script setup>
const checkedNames = ref([])
</script>

<template>
<div>Checked names: {{ checkedNames }}</div>

<input type="checkbox" id="jack" value="Jack" v-model="checkedNames">
<label for="jack">Jack</label>

<input type="checkbox" id="john" value="John" v-model="checkedNames">
<label for="john">John</label>

<input type="checkbox" id="mike" value="Mike" v-model="checkedNames">
<label for="mike">Mike</label>
</template>
radio:use checked property and change event
<div>Picked: {{ picked }}</div>

<input type="radio" id="one" value="One" v-model="picked" />
<label for="one">One</label>

<input type="radio" id="two" value="Two" v-model="picked" />
<label for="two">Two</label>
select:uses value as a prop and change as an event
<div>Selected: {{ selected }}</div>

<select v-model="selected">
  <option disabled value="">Please select one</option>
  <option>A</option>
  <option>B</option>
  <option>C</option>
</select>
Ref
declare reactive state
<script setup>
import { ref } from 'vue'

const count = ref(0)

function increment() {
  count.value++
}
</script>

<template>
  <button @click="increment">
    {{ count }}
  </button>
</template>
nested refs
<script setup>
import { ref } from 'vue'

const obj = ref({
  nested: { count: 0 },
  arr: ['foo', 'bar']
})

function mutateDeeply() {
  // these will work as expected.
  obj.value.nested.count++
  obj.value.arr.push('baz')
}
</script>
reactive(): unlike a ref which wraps the inner value in a special object, reactive() makes an object itself reactive:
<script setup>
import { reactive } from 'vue'
const state = reactive({ count: 0 })
</script>

<button @click="state.count++">
  {{ state.count }}
</button>
Computed Properties
- 计算过程不要有副作用(side effect)
- Think of it as a temporary snapshot - every time the source state changes, a new snapshot is created
<script setup>
import { reactive, computed } from 'vue'

const author = reactive({
  name: 'John Doe',
  books: [
    'Vue 2 - Advanced Guide',
    'Vue 3 - Basic Guide',
    'Vue 4 - The Mystery'
  ]
})

// a computed ref
const publishedBooksMessage = computed(() => {
  return author.books.length > 0 ? 'Yes' : 'No'
})
</script>

<template>
  <p>Has published books:</p>
  <span>{{ publishedBooksMessage }}</span>
</template>
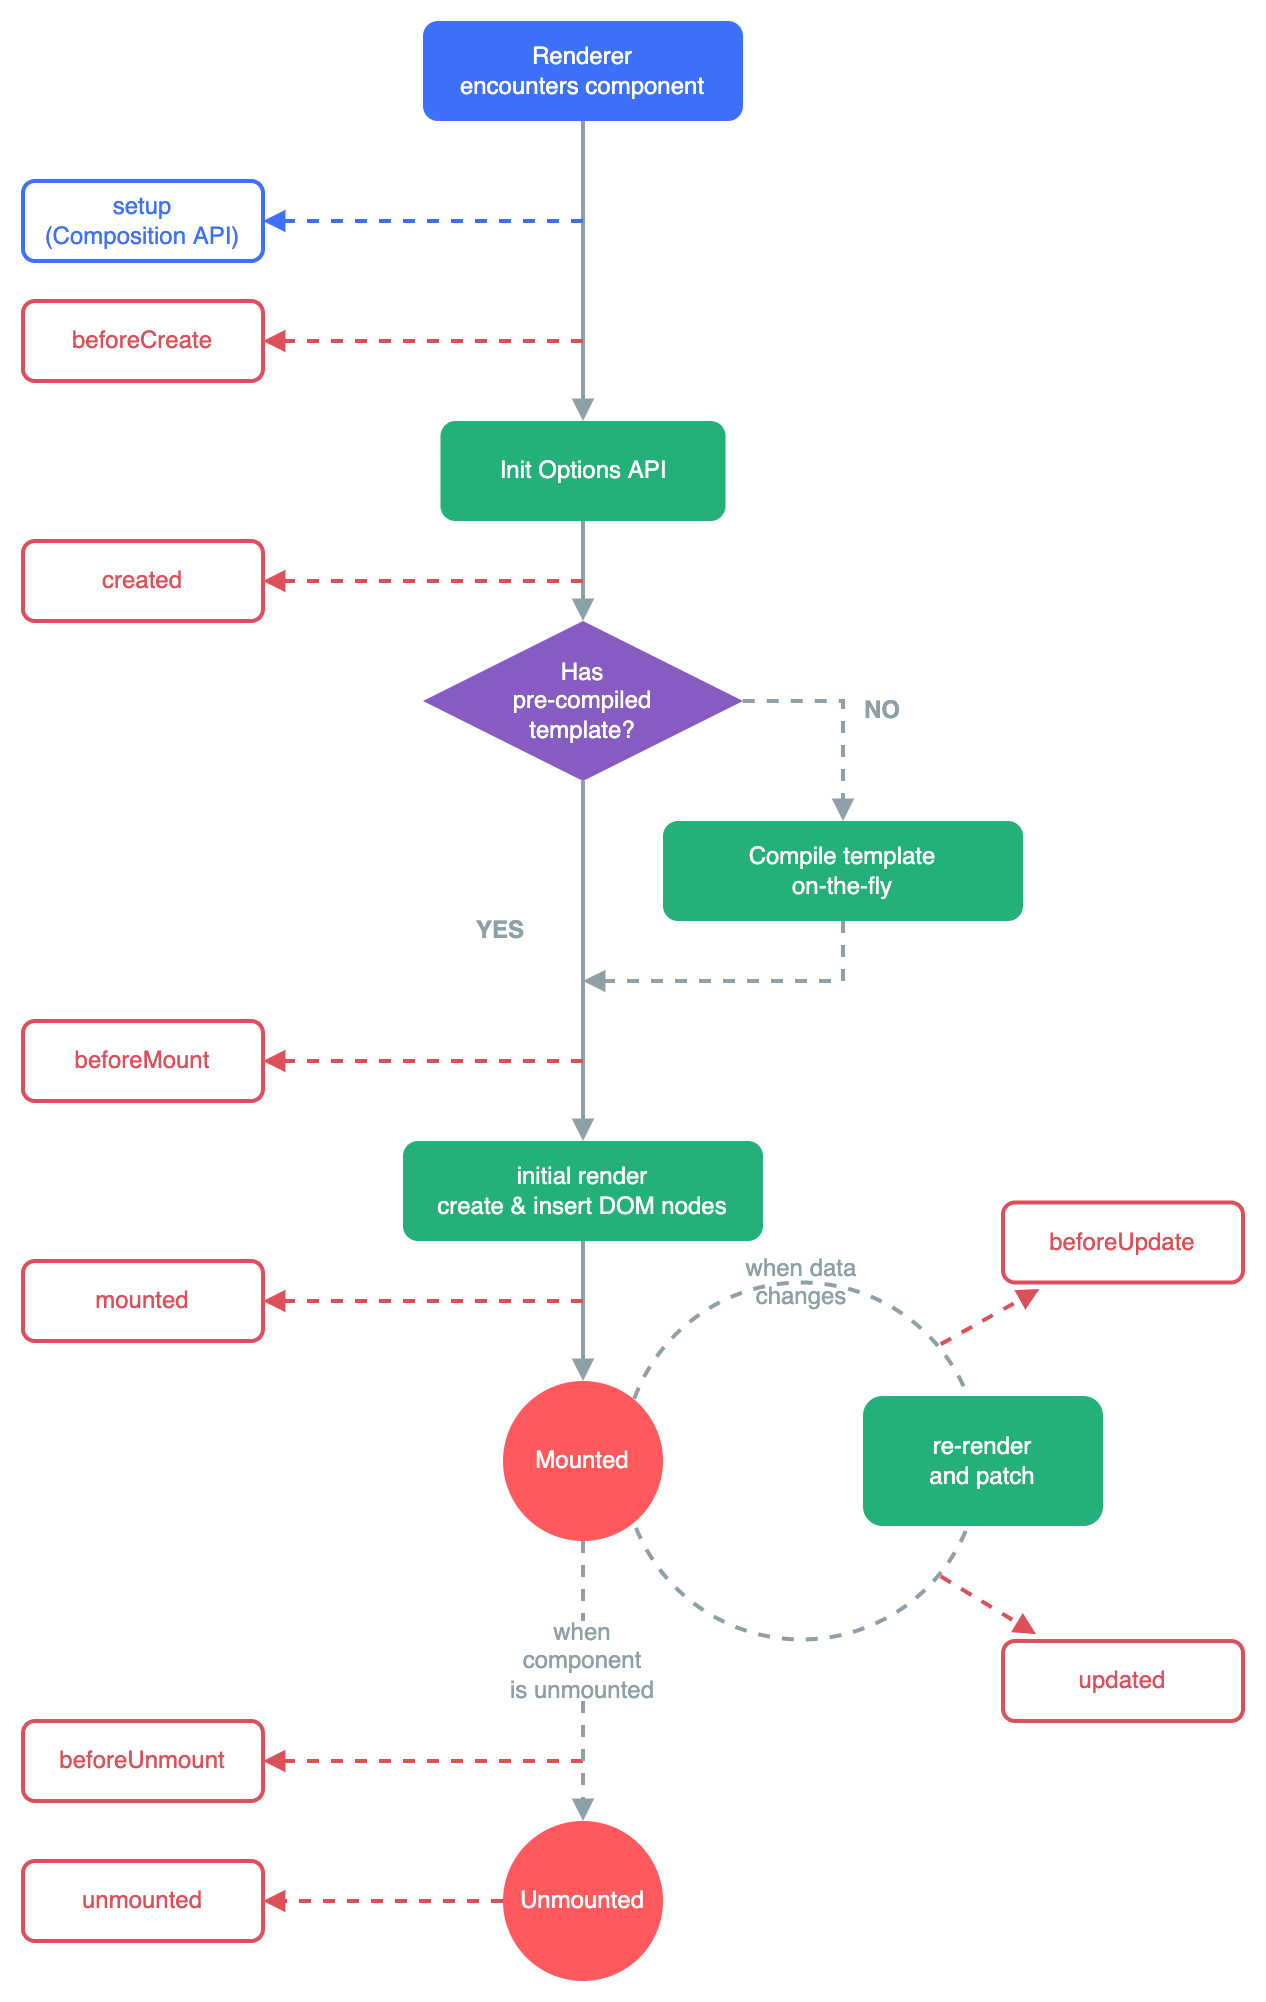
Lifecycle Hooks

registering lifecycle hooks
<script setup>
import { onMounted } from 'vue'

onMounted(() => {
  console.log(`the component is now mounted.`)
})
</script>
Watchers
在每次响应式状态发生变化时触发回调函数
<script setup>
const obj = reactive({ count: 0 })

watch(obj, (newValue, oldValue) => {
  // fires on nested property mutations
  // Note: `newValue` will be equal to `oldValue` here
  // because they both point to the same object!
})

obj.count++
</script>
Eager watcher: executed immediately and then watch
<script setup>
watch(
  source,
  (newValue, oldValue) => {
    // executed immediately, then again when `source` changes
  },
  { immediate: true }
)
</script>
Once watcher: trigger only once
<script setup>
watch(
  source,
  (newValue, oldValue) => {
    // when `source` changes, triggers only once
  },
  { once: true }
)
</script>
Component
Using component
<script setup>
import ButtonCounter from './ButtonCounter.vue'
</script>

<template>
  <h1>Here is a child component!</h1>
  <ButtonCounter />
</template>
props
Define props
<script setup>
const props = defineProps(['title'])
console.log(props.title)
</script>

<template>
  <h4>{{ title }}</h4>
</template>
Passing props
<BlogPost title="My journey with Vue" />
Props with typing
<script setup lang="ts">
const props = defineProps({
  foo: { type: String, required: true },
  bar: Number
})

props.foo // string
props.bar // number | undefined
</script>
Emit
<script setup>
defineProps(['title'])
defineEmits(['enlarge-text'])
</script>

<template>
  <div class="blog-post">
    <h4>{{ title }}</h4>
    <button @click="$emit('enlarge-text')">Enlarge text</button>
  </div>
</template>

<!-- usage
<BlogPost
  @enlarge-text="postFontSize += 0.1"
 />
-->
slot
<template>
  <div class="alert-box">
    <strong>This is an Error for Demo Purposes</strong>
    <slot />
  </div>
</template>

<!-- usage
<AlertBox>
  Something bad happened.
</AlertBox>
-->
Note from Vue 2
父页面传参用props
# component部分
Vue.component('blog-post', {
  props: ['title'],
  template: '<h3>{{ title }}</h3>'
})

# 页面部分
<blog-post title="My journey with Vue"></blog-post>
注意:props一般不能改变
How to Use Props in Vue: The Ultimate Guide Vue Error: Avoid Mutating a Prop Directly
组件向要改变父页面参数要用 $emit
// component部分
<button v-on:click="$emit('enlarge-text', 0.1)">
  Enlarge text
</button>

// 页面部分
<blog-post
  ...
  v-on:enlarge-text="onEnlargeText"
></blog-post>
v-model 要使用下面这种方式绑定
// component部分
Vue.component('vmodel', {
  props: ['value'],
  template: '<input v-bind:value="value" v-on:input="$emit(\'input\', $event.target.value)">'
})

// 页面部分
<vmodel v-model="searchText"></vmodel>
引用对象
先引入组件
import ECharts from 'vue-echarts'
在页面中引用时,指定 ref
<v-chart ref="chart" :options="orgOptions"></v-chart>
然后通过 this.$refs.chart 即可引用该对象
API
Fetch
import { ref, onMounted } from 'vue';

const data = ref([]);

const fetchData = async () => {
  try {
    const response = await fetch('https://api.example.com/data');
    if (!response.ok) {
      throw new Error('Network response was not ok');
    }
    const result = await response.json();
    data.value = result;
  } catch (error) {
    console.error('Error fetching data:', error);
  }
};

onMounted(() => {
  fetchData();
});
post
const response = await fetch('https://api.example.com/data', {
  method: 'POST',
  headers: {
    'Content-Type': 'application/json',
  },
  body: JSON.stringify(inputData.value),
});
Axios
Install & Import
安装
npm install --save axios vue-axios
导入
import Vue from 'vue'
import axios from 'axios'
import VueAxios from 'vue-axios'

Vue.use(VueAxios, axios)
Request
this.axios
  .get(api)
  .then(
    (response) => {
      console.log(response.data)
    }
  )
  .catch(err => {console.log(err)})
传参
axios.get('https://httpbin.org/get?answer=42')
等价于
axios.get('https://httpbin.org/get', {params: {answer: 42}})
Router
创建 router
// router.js
import { createRouter, createWebHistory } from 'vue-router'

import HomeView from './HomeView.vue'
import AboutView from './AboutView.vue'
import NotFoundPage from './NotFoundPage.vue'

const routes = [
  { path: '/', component: HomeView },
  { path: '/about', component: AboutView },
  { path: '/:pathMatch(.*)*', component: NotFoundPage, }, // catch-all route for 404
]

const router = createRouter({
  history: createWebHistory(),
  routes,
})

export default router
createWebHistory v.s. createMemoryHistory
| Feature | createWebHistory |
createMemoryHistory |
|---|---|---|
| URL Appearance | Clean URLs (e.g., /home, /about) |
Does not affect browser’s address bar |
| Use Case | Production environments, SEO | SSR, testing, non-browser environments |
| Server Configuration | Requires server-side fallback handling | No server configuration needed |
| Navigation Stack | Managed by browser’s history stack | Managed in memory |
router-link 方式
使用 query 传参
路由需由 path 引入
<router-link :to="{path: '/home', query: {key: 'hello', value: 'world'}}">
  <button>跳转</button>
</router-link>
跳转地址:/home?key=hello&value=world
参数:this.$route.query.key
使用 params 传参
路由需由 name 引入
<router-link :to="{name: '/home', params: {key: 'hello', value: 'world'}}">
  <button>跳转</button>
</router-link>
跳转地址:/home
参数:this.$route.params.key
$router 方式
使用 query 传参
this.$router.push({
  path: '/detail',
  query: {
    name: 'admin',
    code: 10021
  }
});
跳转地址:/detail?name=admin&code=10021
参数:this.$route.query.name
使用 params 传参
this.$router.push({
  name: 'detail',
  params: {
    code: 10021
  }
});
跳转地址:/detail
参数:this.$route.params.code
unplugging-vue-router
Environment Variables
Vite - Env Variables and Modes
// only variables prefixed with `VITE_` are exposed to your Vite-processed code
console.log(import.meta.env.VITE_SOME_KEY) // "123"
console.log(import.meta.env.DB_PASSWORD) // undefined
TypeScript Guide
Markdown
Echarts
部署
- 打包
npm run build
-
将发布包文件夹
dist上传至服务器 -
配置 Nginx
server {
    listen 80;
    server_name localhost;
    charset utf-8;
    root /path/to/dist;
}
- 或者配置 Caddy
your_domain {
	handle_path /web/* {
        root * /path/to/your/vue/app/dist
        file_server
        encode gzip
        try_files {path} /
	}
}
- 如果需要配置子路径,需要在
vite.config.mjs加上base: "/prefix",且在 Caddyfile 配置handle_path